Here is the situation:
- On a USB flash drive, you have important data.
- Your flash drive is corrupted, so it demands to be formatted every time you try to open Explorer or connect it to your PC.
- Still, formatting your flash drive will wipe all of its data off. What right now?
Though that flash drive is corrupted, it is possible to format a USB without losing data by a few additional processes. We are going to show it to you here.
What Comes From Formatting a USB?
Although the term "formatting" is used frequently, there are actually three different procedures carried out on USB flash drives and other storage devices to ready them for use:
- High-level formatting: Most people are familiar with high-level formatting. Like exFAT, FAT32, NTFS, etc., this method installs the file system (along with directory layout and file allocation table). Usually, integrated disk management tools let one do this instead easily.
- Partitioning: Partitioning distributes a physical disk among several "logical", or "soft" drives. The computer sees each piece as an independent drive, similar to when one slices a pizza into multiple pieces.
- Low-level formatting: Usually performed by manufacturers, this process sets the drive's physical layout including sector and track layout. If high-level formatting will not work, normal users are able to apply low-level formatting (more on this later).
Among these techniques, only partitioning offers a decent possibility of keeping your data unmodified. To avoid data loss, however, you can only create a partition out of the free space still on the drive. Even then, it’s not always a 100% success – especially if something goes wrong during the process (like improper partitioning or sudden power loss).
Reasons for USB Flash Drive's formatting demand
Your USB's asking to format before usage suggests extreme damage or incompatibility. These especially explain why this prompt seems to arise:
- Corruption: Improper ejection, bad software, and other types of logical harm can all lead to corruption. Your USB could appear RAW, seek for a format, or might not even show at all if corrupted. Data recovery tool enables you to recover files from a faulty USB, though.
- Physical damage: Extreme temperatures, water damage, wear and tear, and breakage occur frequently on USB flash drives; all of them might trigger your drive to act unpredictably.
- File system error: Your USB flash drive may experience problems with its file system or be using an incompatible one. Windows now only supports NTFS, FAT32, and exFAT types.
- System incompatibility: Should you have used the thumb drive on another device, configurations might have been applied incompatible for the current device.
- Infection by viruses and malware: Malware or Virus may have caused corruption and change the manner in which your drive operates.
Is it true that formatting a USB drive deletes everything?
Although on the surface similar, quick formatting and full formatting are really two different techniques with differing consequences.
- Fast formatting: just keeps the data unmodified while deleting the file system. Though you won't view your data in File Explorer, you will still require data recovery programs to retrieve it.
- Full formatting: removes everything from the flash device. Full formatting makes data irretrievable by zeroes covering the sectors of the disk. It also prohibits the use of faulty blocks later on, thus avoiding old mistakes from being passed over.
How to format a USB drive without losing files?
So, if your USB demands to be formatted the moment you connect it to your computer, how can you secure your files?
- Make a byte-to-byte copy of your data on your flash drive to act as a backup image destination. After that, we can get each bit from the image backup.
- The USB flash drive can be securely formatted (there are several ways to do this) once the data from the image backup reaches a secure place.
This method will let you format a severely corrupted USB flash disk without losing any data. The parts after will meticulously walk through every stage.
Your data is secured now, thus you can safely arrange your drive without losing any files. Native Windows USB format utilities allow you to format your USB flash drive in three distinct ways below.
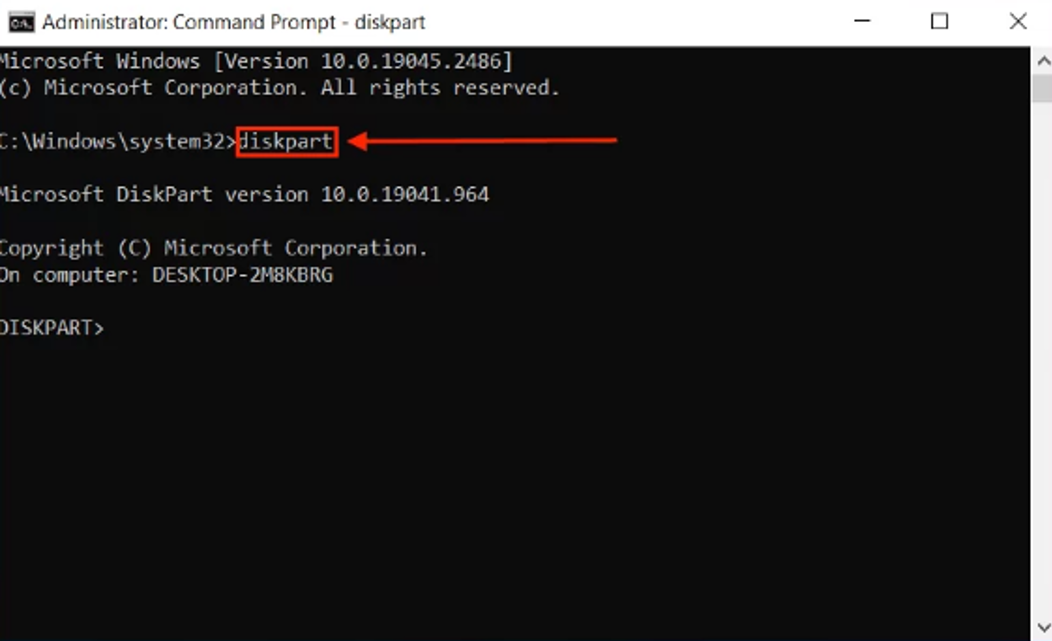
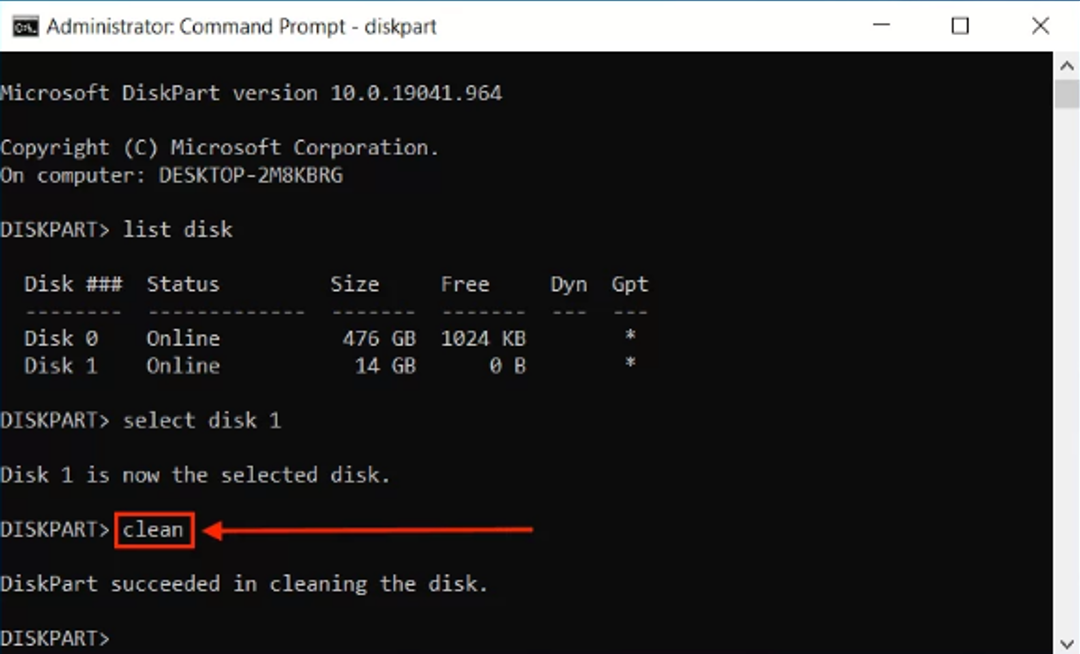
Method 1: Format USB Drive - Using CMD (diskpart)
The Windows command line tool is the Command Prompt, sometimes referred to as "CMD." Users of the Diskpart command may directly impact their disks, partitions, and volumes. We will walk you through using it to organize your USB flash drive.
- Launch Command Prompt as Administrator.
- Type the next command and hit Enter:
diskpart - Type Enter here the following command:
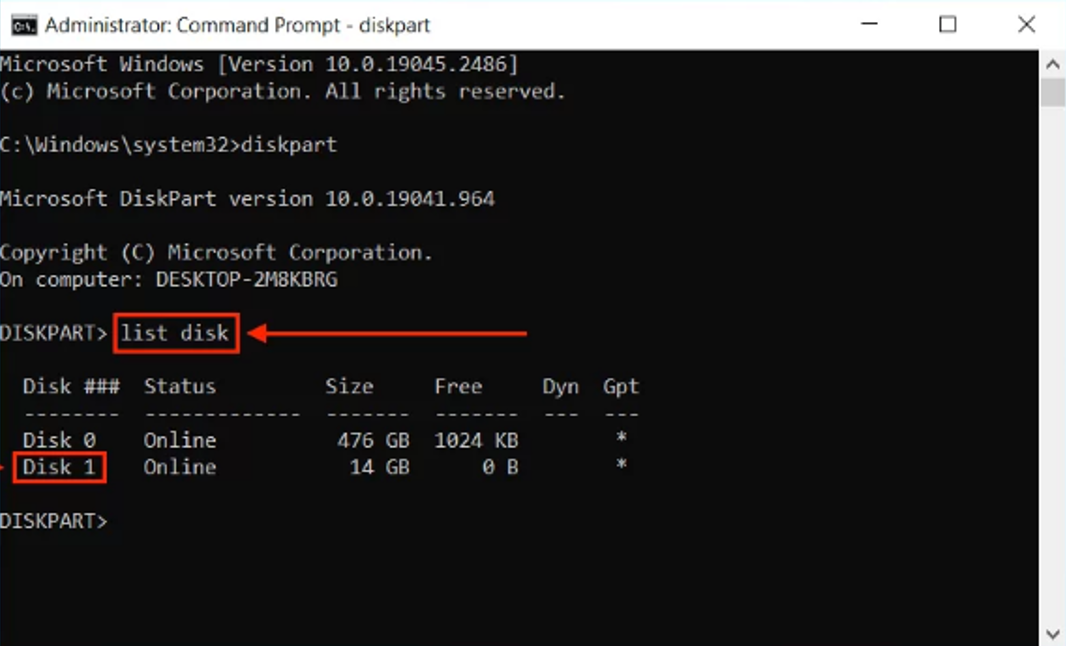
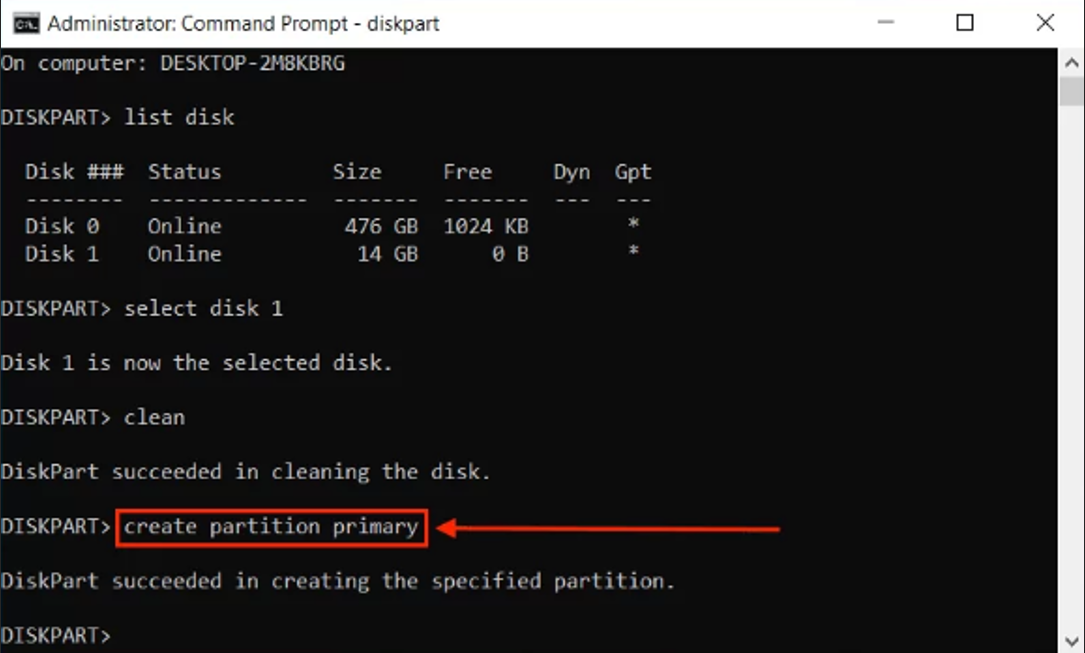
List disk. - Look in the very first column at your flash drive's Disk ###. Then type the following without quotes and hit Enter:
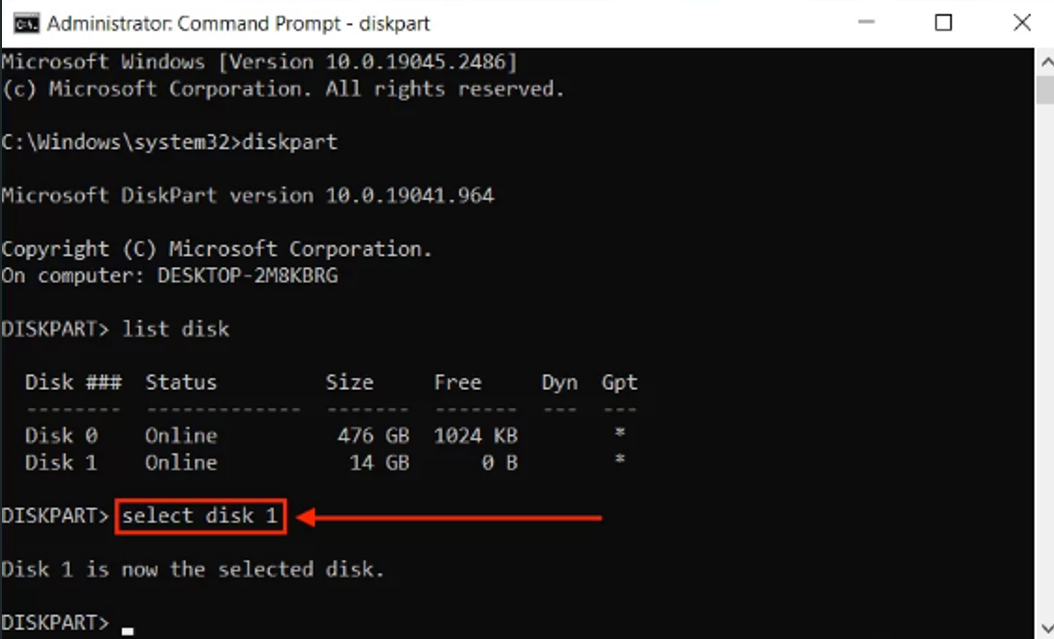
choose disk "Disk #." - Type the following to remove the data and metadata off a USB stick: Enter:
clean - Type this command and hit Enter:
create partition primary - Type this command and hit Enter:
format fs=exfat - Type the following command (substitute any letter you choose for "x"). Hit Enter:
assign letter=x


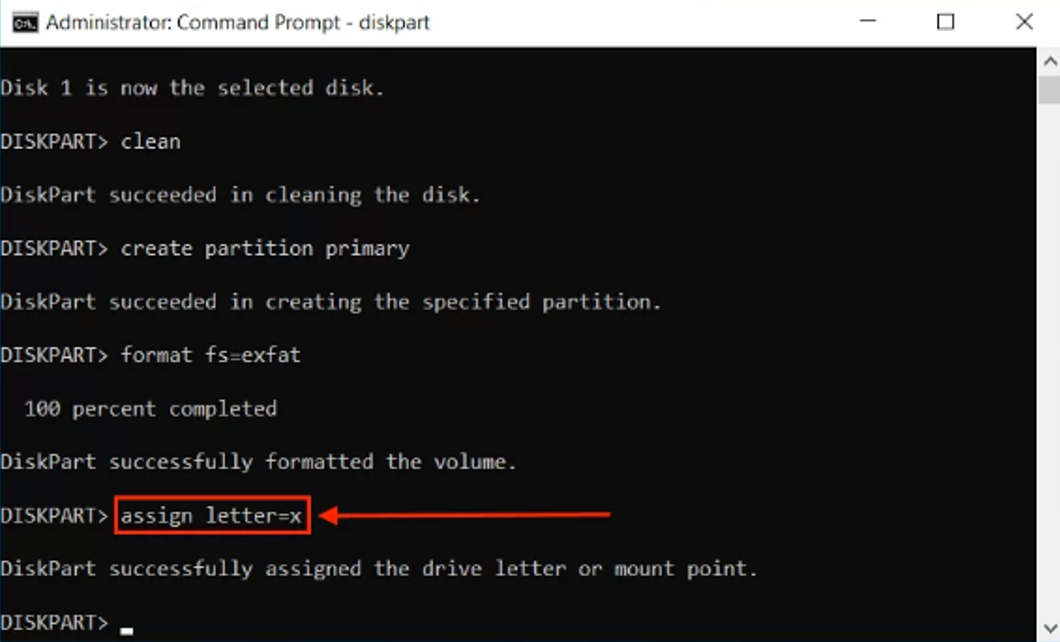
The formatting procedure will be finished once these commands are entered. Try using your USB after exiting Command Prompt.
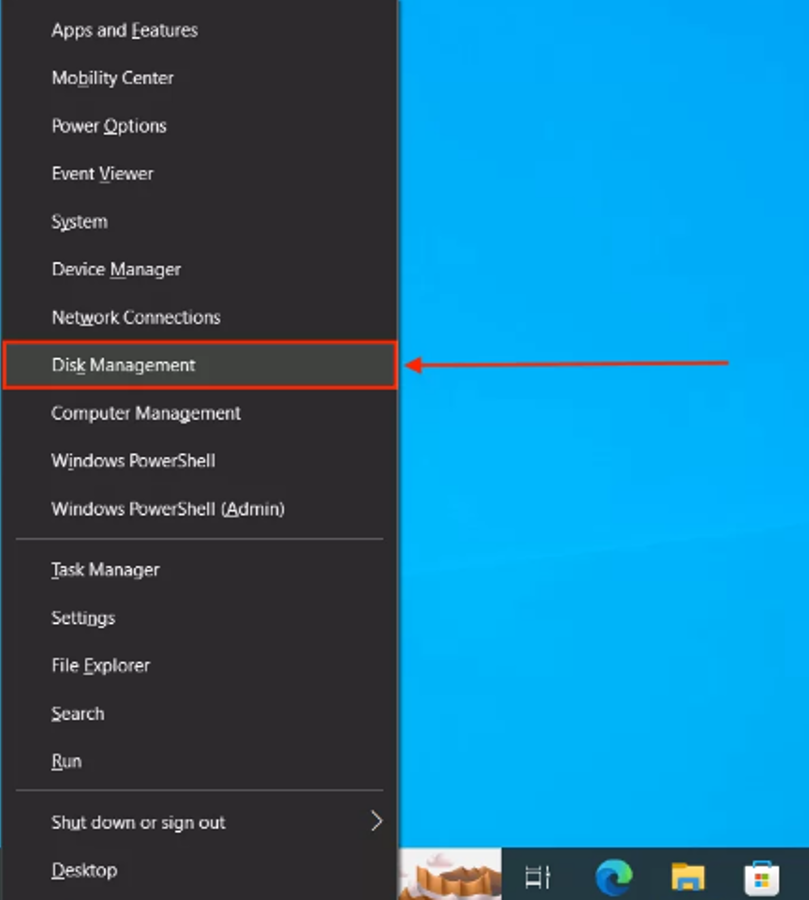
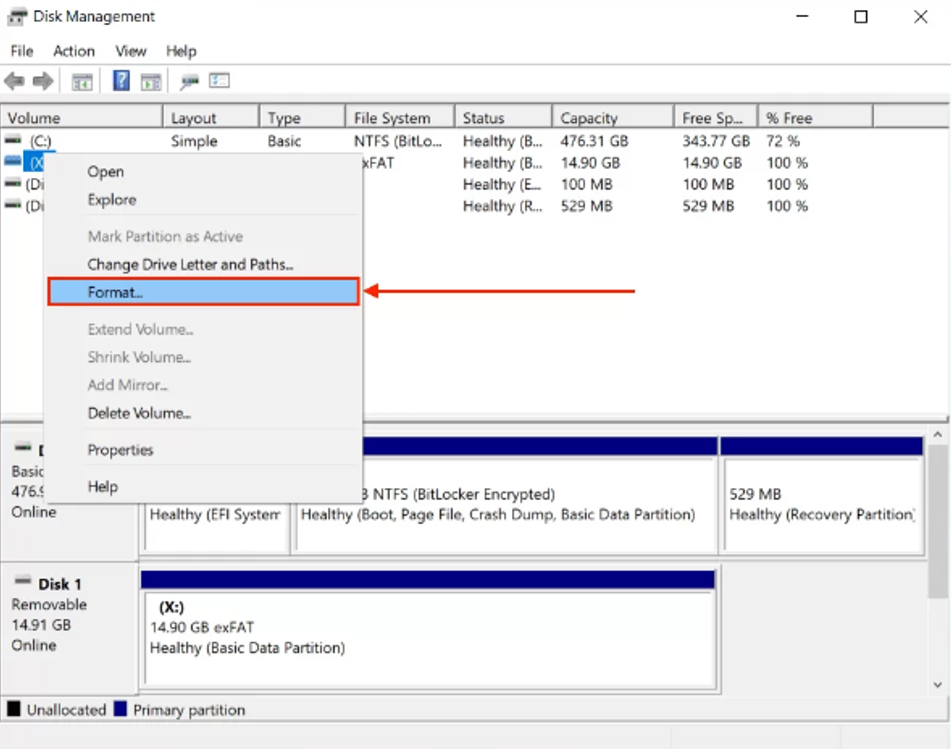
Method 2: Format USB Drive - Using Disk Management
Still another native Windows function is disk management. It features a visual interface unlike Command Prompt where users may just click to change their disks, volumes, and partitions.
- Press Windows + X keys > Disk Management to launch it.
- Click Format following a right-click on your USB flash device.
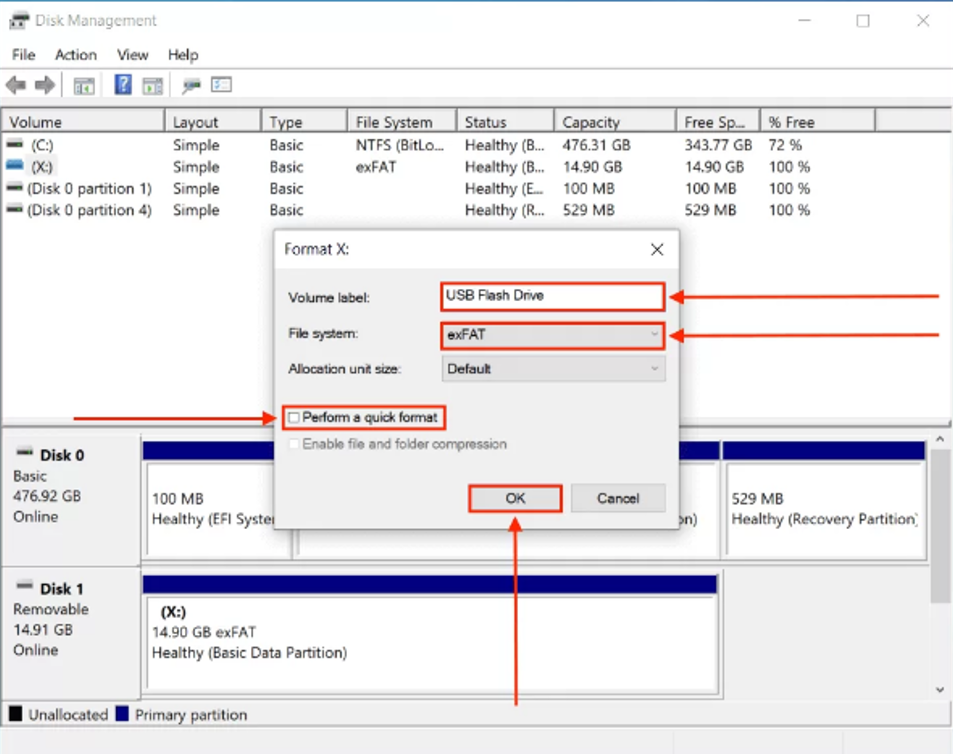
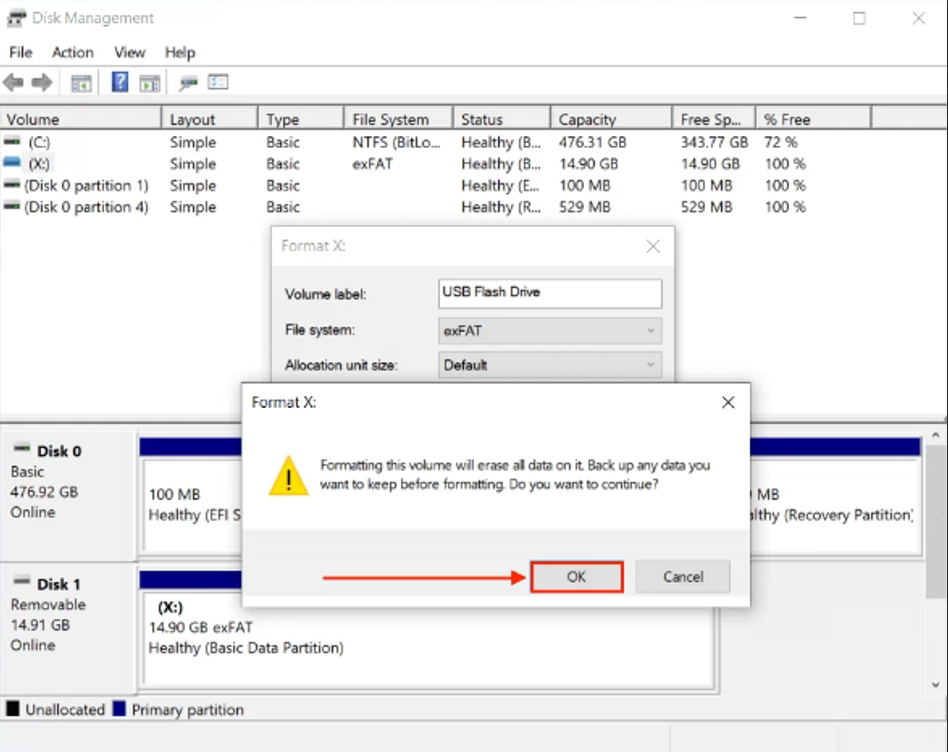
- Specify ExFAT as your File System and label your disk. Then turn off the Perform fast format setting (you can turn it on if you wish to switch the USB format without losing data, but you will still need to utilize data recovery tools). After that, click OK.
- To confirm, simply click OK again.
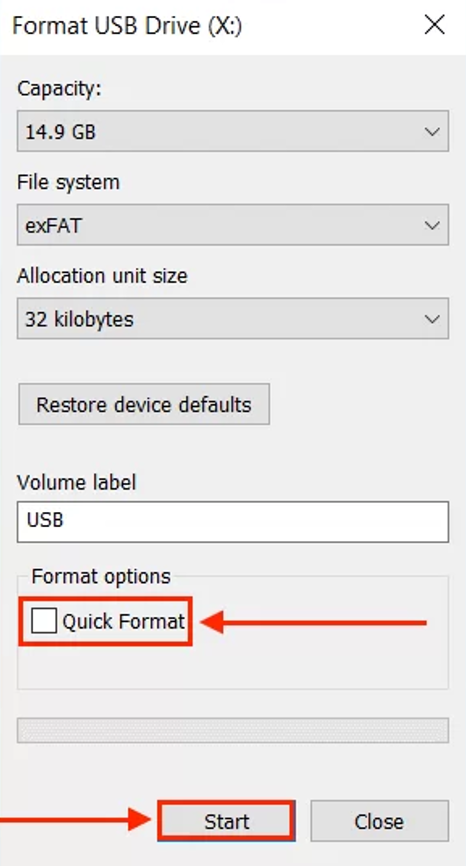
Method 3: Format USB Drive - In File Explorer
Your drive may also be formatted straight in File Explorer (should it show there). Launch File Explorer with your drive attached to it. Click Format after browsing to This PC right-click your drive (or right-click it in the sidebar).
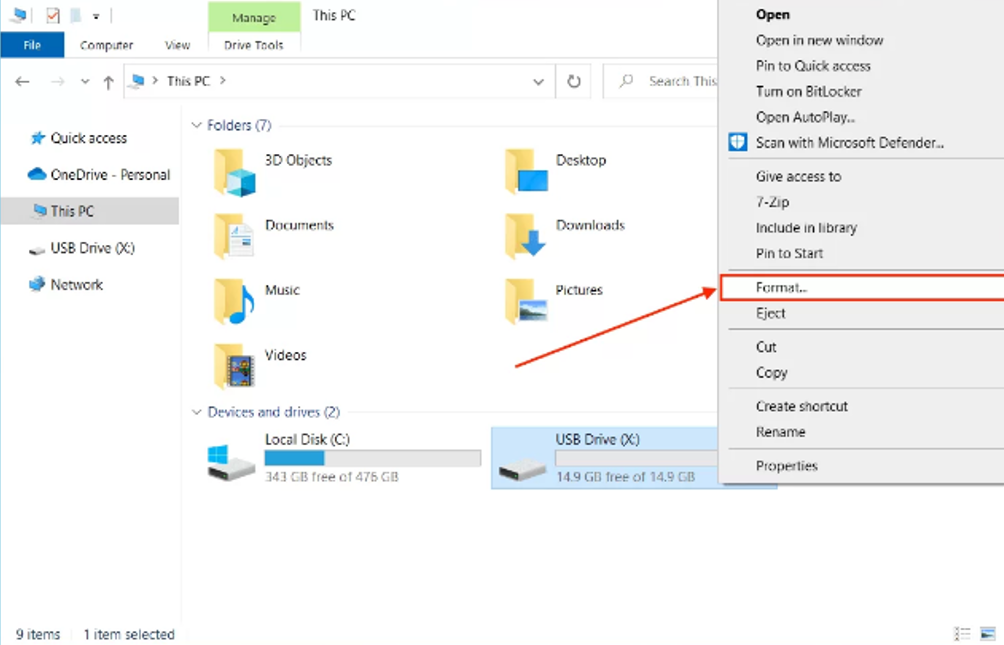
To help us remove errors, please name your drive, choose the exFAT style, and turn off Quick format. Click Start afterwards.
Note: If you lost your data while formatting your USB Drive, use BLR Pen Drive Data Recovery Tool to Recover Formatted USB Drive Data.
If you've lost important information while formatting your USB drive, don't panic; the BLR Pen Drive Data Recovery Tool will help you recover it fast and efficiently. Download and install the program first on your PC. Designed to retrieve lost or deleted files from formatted USB Drive, this utility supports several file types, thereby ensuring that your important information is restored without trouble. Even non-technical people may do data recovery in just a few steps thanks to a simple interface.
Method 4: Use Professional Disk Recovery Tool
You may us a professional disk recovery tool such as the BLR Pen Drive Data Recovery Tool to recover corrupted USB drive. Follow the basic guidelines to retrieve your missing data from a formatted USB drive:
- Step 1: Download and Install BLR Pen Drive Data Recovery Tool
- Visit the official BLR Tools website.
- Download the Pen Drive Data Recovery Tool.
- Install the software by following the on-screen instructions.
- Step 2: Connect Your USB Drive
- Insert the formatted USB drive into your computer.
- Ensure that the system recognizes the USB drive before proceeding.
- Step 3: Launch the Software
- Open the BLR Pen Drive Data Recovery Tool.
- Select your formatted USB drive from the list of available storage devices.
- Step 4: Scan for Lost Data
- Choose the Formatted Drive Recovery option.
- Click the Start Scan button to begin scanning your USB drive.
- The tool will start analyzing the drive for lost or deleted files.
- Step 5: Preview and Select Files
- Once the scan is complete, a list of recoverable files will be displayed.
- Use the preview feature to verify the files you want to recover.
- Select the desired files by checking the boxes next to them.
- Step 6: Recover the Data
- Click the Recover button.
- Choose a secure location on your computer to save the recovered files (do not save them back to the USB drive to avoid overwriting).
- Wait for the recovery process to complete.
- Step 7: Verify Recovered Files
- After recovery, navigate to the folder where the files were saved.
- Check if all your data has been restored successfully.
Share this post
Author

Leave a comment
All comments are moderated. Spammy and bot submitted comments are deleted. Please submit the comments that are helpful to others, and we'll approve your comments. A comment that includes outbound link will only be approved if the content is relevant to the topic, and has some value to our readers.
Comments (0)
No comment